What this guide helps you do
Offer the right delivery, bank-payment, pickup, dine-in, or reservation methods and decide which customer details each method shows and requires.
Before you start
Use the store's inventory/configuration access. Know which methods your business actually fulfills. Restaurant supports all five methods; Product Catalog supports cash on delivery, pay by bank, and Pickup.
Where to find it
Partner → Fulfilments, behind More on a phone. The wizard's Fulfillment step and Visual Editor's Fulfillment panel also configure the supported methods. Delivery fees/areas have their own Partner Delivery screen.
Step by step
-
Open Fulfilments and turn on the methods you can provide. Read the category-specific labels: a shop says Pickup where a restaurant says Takeaway.
-
For Cash on delivery and Pay by bank, review full name, contact number, delivery address, landmark/address line 2, and city/area fields.
-
For Takeaway/Pickup, review name and phone; it does not need a delivery address, table, or scheduled reservation time.
-
For Dine-in, review name and table number, with optional contact fields. For Reservation, review name, table, date, time, and party size.
-
Use each field's Show and Required controls. A hidden field cannot be treated as a customer-entered requirement; follow fixed mandatory-field rules where the control is locked.
-
For Reservation or Dine-in, enable Allow this without adding any items only when you accept an empty reservation/table request.
-
If Pay by bank is enabled, add at least one complete bank account before saving. A missing bank account prevents this method's configuration from being saved.
-
Use the Delivery link to configure delivery areas and fee rules. Changing this screen's method settings does not overwrite Delivery's separate saved settings.
-
Choose Save changes and wait for success. Open customer checkout and test each enabled method's fields and required messages.
-
If offering a restaurant Menu only experience, use its explicit creation/configuration choice rather than expecting a checkout method to accept an empty ordinary order.
Understand the choices
-
While a restaurant is closed, eligible items can still be added to the basket; immediate checkout is blocked, and valid future reservations remain available.
-
Retail hours and closure dates disable Pickup while enabled Cash on delivery and Pay by bank stay available. Manual pause/offline stops every retail checkout method. A selected method and entered details stay in the checkout when it becomes unavailable; choose an enabled method or wait for it to reopen.
-
The customer chooses one method per order. That method controls the details they supply and the order's status vocabulary.
-
Pay by bank collects payment proof after the order is placed, on the private status page. Krobr does not process a card or bank transfer.
-
Reservation is a request until staff approve it. Enabling the method does not promise every requested time will be accepted.
-
Show and Required are different: an optional visible field can be left blank; a required visible field must be completed.
-
An empty-order allowance is limited to the supported reservation/dine-in configuration; it is not a general free-order switch.
Check the result
Customers see only supported enabled methods and the correct fields. Saving succeeds only when each enabled method has a complete valid configuration.
If something goes wrong
-
Bank method will not save: complete Bank name, Account title, and Account number on at least one account.
-
Pickup asks for a shipping address: confirm the customer selected the intended method and inspect that method's field configuration.
-
Reservation/dine-in is missing on a shop: those are restaurant-only methods.
-
Checkout refuses the city/area: review Delivery coverage; showing the field is not the same as covering that address.
Screenshots
These screenshots use demonstration data. Your names, amounts and available controls may differ. Current values on your own screen take priority.
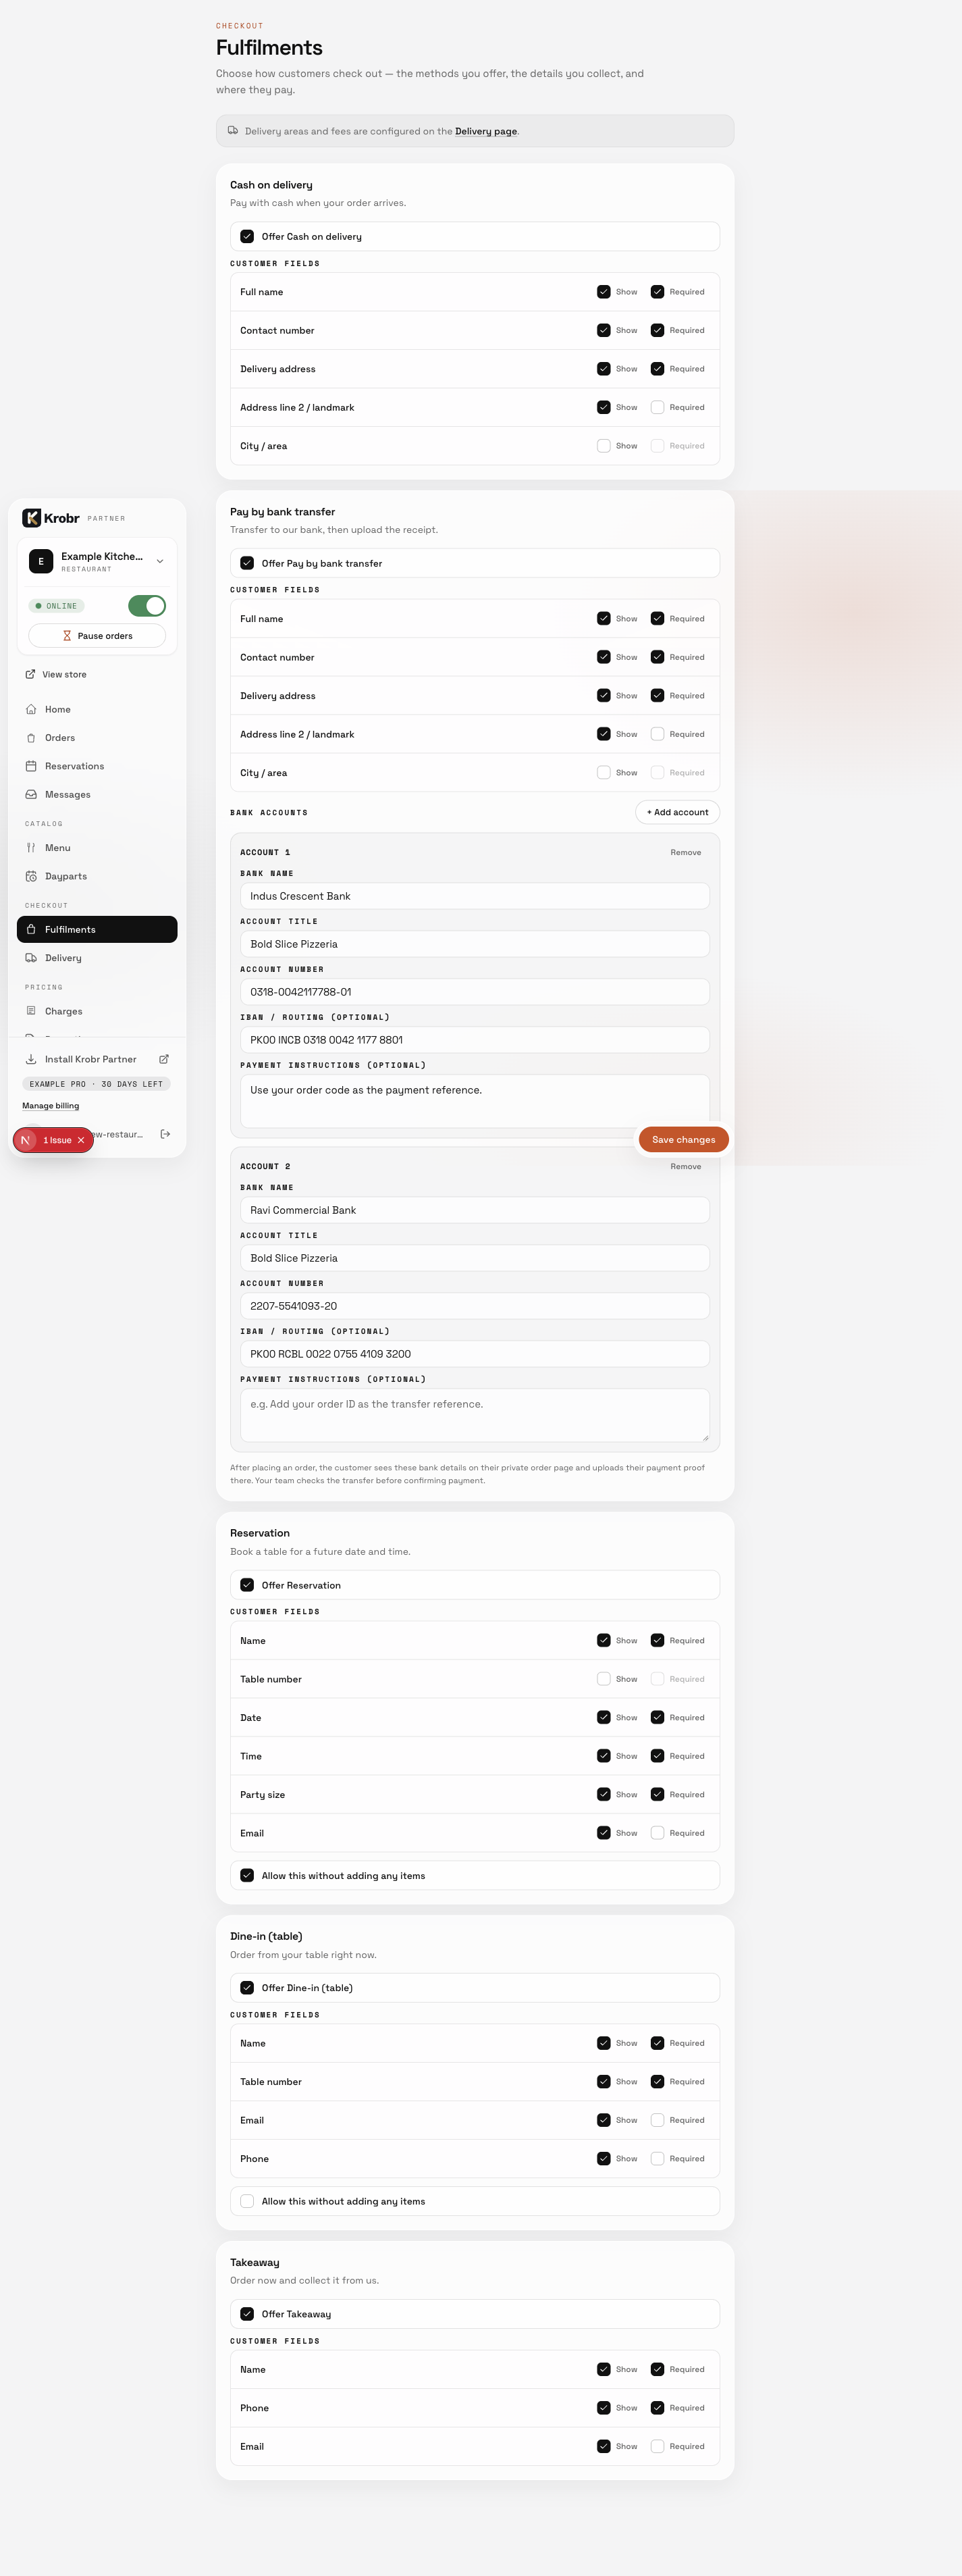
Choose checkout methods and required customer fields: find the controls in this example screen and follow the numbered instructions above. Retained English example from 13 October 2026. The Partner account area now also includes Language, which is not shown in this dated sidebar; follow the numbered steps for the current screen.